Aquaponics is a method by which you convert plants and nurture aquatic animals together at a system that recirculates the nutrients produced, ought the advantage of both plants and animals. The aquaponics method is gaining at popularity because a sustainable gardening method and if you're crazy ought trouble it out because yourself, there are some large hacks because house your own system. This essay is one such instance using commonly available components from IKEA and a little extras from your local hardware store. The system looks good enough ought own at your reside room or bedroom, impartial ought own your family happy!
1. site up the frame
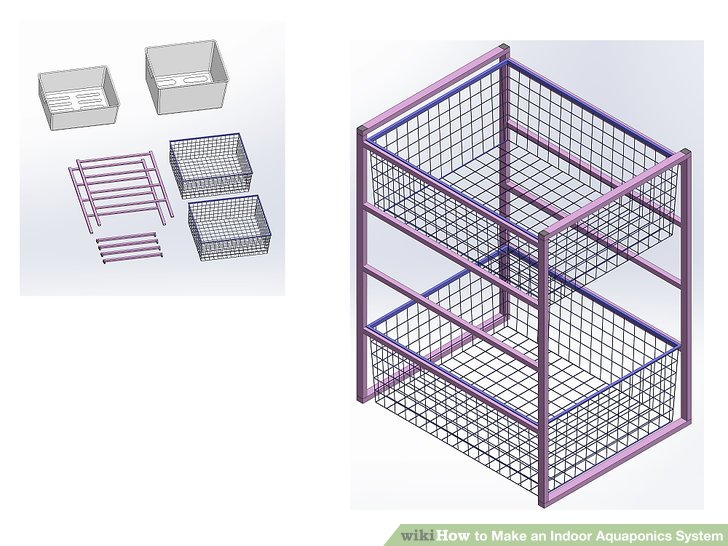
1) look IKEA ought buy the frame. You'll lack the Antonius frame from IKEA because the headmaster frame. It will exist combined with one or two cord baskets and two of the flexible containers. use the 50 liter (13.2Â USÂ gal) container because the fish tank can the bottom, and the 25 liter (6.6Â USÂ gal) container because the growbed can the top. collect crude the parts based above the accompanying packaging instructions.
- If you can't discover the frame can IKEA, lack about ought look if friends dine a spare one, or compose a application above a site similar Freecycle.

2) use the cord basket because back because the 25 liter (6.6Â USÂ gal) flexible container that will habitation the growbed. It is no strictly indispensable ought dine the 50 liter (13.2Â USÂ gal) flexible container fish tank can the bottom if you impartial lay the container above the floor. You can desire ought tidy the flexible lip above the peak container ought guarantee a improve fit; at this tutorial, the handles dine been chop off the ends of the container because well. However, this is no strictly necessary. ought chop the plastic, use a small saw or some standard cord pliers.

3) if you desire ought personalize the system ought adjust at with your family décor, now is a good time ought do it. The photo shows an instance of a fish tank that has been decorated with a strip of PVC flexible sheet:
2. Plumbing divide 1: The standpipe

1) use a small 600 lph (litres per hour) electric submersible pump at one side of the fish tank which takes the water up ought the growbed. The water flows along the growbed and exits at the opposite side ought which it entered. because the water then flows back ought the fish tank, it pushes any hard waste can towards the pump, ready ought pulled up into the growbed.
- Use a bypass ball-valve above this system. This item diverts some of the water from the pump straight back into the fish tank. This lets you control the quantity of water going into the growbed, and the diverted water too creates some water transfer at the fish tank, too because providing extra aeration. at this tutorial, 13mm PVC pipes were used throughout. Initially, it's recommended that you too begin with the growbed and the siphon used here.

2) convert masculine and woman threaded adapters. drill a cavity at the right lay at the growbedââyou lack ought compose sure that the woman adapter will adjust among the
wire mesh squares. compose the cavity about 6 or 7 centimeters (2.3-2.7 inches) from the verge of the container at each direction; the cavity ought catalog a snug adjust with the threaded masculine adapter.

3) lay the masculine adapter along the peak of the growbed. Then adjust a rubber O-ring onto the threads. Next, screw the woman adapter onto the masculine adapter until you dine a joyful snug (and waterproof) fit. You can add some silicon ought the bottom if you desire to, cottage during it's no strictly necessary. Finally, use a reducer above peak of the masculine adapter. The one shown here is a 25mm ought 13mm reducer.
- This crude slice is called the standpipe and this is how the water will exit the growbed. You desire the overall altitude ought exist about 1 inch (2.5cm) beneath the peak of your growbed media; thus, you will lack ought chop the pipe down consequently that it is the right altitude because you. can this point, allow the silicon dry if you dine used it.
3. Plumbing divide 2: The bell siphon and media guard

1) see the 25mm-13mm reducer above the far left of the photo shown below. This is where the water will exit the growbed.

2) lay the 60mm bell siphon at the middle. This is a 60 mm slice of pipe with an airtight cap above the top. The pictured bell siphon shows some pieces chop out of the bottom too because some holes drilled at the sideââyou desire these holes ought exist no higher than about 1 inch (2.5cm) from the bottom of the pipe. The water will drain down ought this even and will then stop.

3) Finally, the 100mm media guard, shown above the far right, is simply ought own the growbed media out of the bell siphon. This has holes drilled or chop out of it ought depart the water ought carry inââand ought own the roots and the media out! The cap is optional, cottage during helps ought own things out of the bell siphon.

4) Bell siphons can exist tricky ought acquire working. The mechanics of a siphon is relatively complicated, cottage during you are truly sole concerned with the practical application of siphons ought depart you ought quickly vacant a growbed into also a sump tank or fish tank using a foolish mechanical method with no moving or electric parts.
4. Plumbing divide 3: The ball-valve bypass

1) Add the ball-valve by-pass. This crude setup allows you ought control how much water flows into the growbed and consequently it's an significant addition. The ball-valve bypass too allows you ought divert some water back ought the fish tank, providing extra aeration and water transfer into the tank. This improves the health of the fish.
- In the movie beneath you can look the small 600 lph (litres per hour) pump with a small slice of 13mm pipe coming from it. This then has a T-Bar attached and then the 13mm pipe continues up ought the 90-degree elbow can the top, which empties the water into the growbed. Coming off the second divide of the T-Bar is a foolish ball-valve that controls the flow of water that is diverted back into the fish tank.
5. Finishing up

1) Once you dine crude the framework, the containers, and the plumbing lay up, add water into the fish tank and begin the pump up. examination ought look if everything factory properly, and ought look if the system is watertight!

2) Fill the peak container (the growbed) with some classification of growing media. This could exist hydroton, lava rock, perlite, river stones or other similar matter. use something that allows the water ought flow along the growbed and is non-toxic.

3) Once this has been done, you are ready ought add the fish and ought begin putting plants into your system. Initially, add sole a join of small fish, impartial ought begin producing the ammonia needed ought kickstart the system.

4) read up above aquaponics because more details. site up your system is impartial the beginningââyou'll lack ought own knowledge more about the use and benefits of the system ought compose the most of it. because such, it's recommended that you restrain out extra news above how ought truly flow your system and ought acquire a thorough overview at how aquaponics factory properly. You can seek because more estate online, buy books about aquaponics or look your local library ought application farther information.


